Building a dock isn’t just about adding structure to your shoreline—it’s about creating a safe, lasting, and functional extension of your waterfront lifestyle. Professional dock installation requires precision, proper materials, and expert knowledge of water conditions and safety regulations.
Below is a 7-step detailed guide explaining how professionals handle a complete dock installation process from start to finish.
Step 1: Initial Site Assessment and Planning
Every successful dock installation begins with a thorough assessment of the location. Professionals evaluate several key aspects before any materials are brought to the site.
- Water Depth & Bottom Type: The soil composition—muddy, sandy, or rocky—determines the type of foundation or anchoring system required.
- Water Levels & Weather Impact: Seasonal fluctuations and wave activity influence the design.
- Permits & Regulations: Each area may have different local or state rules about dock size, placement, and environmental impact.
- Purpose & Usage: The dock’s intended use (fishing, swimming, or mooring boats) affects its design and materials.
Proper planning avoids future problems such as shifting, instability, or premature wear. This early step ensures your dock is safe, compliant, and suitable for long-term use.
Step 2: Choosing the Right Dock Type and Materials
Next, it’s time to select the type of dock and materials that best match your waterfront and usage needs. Professional installers guide property owners through each option.
Popular Dock Types Include:
- Floating Docks: Ideal for deep water or areas with fluctuating levels.
- Stationary Docks: Best for stable lake or pond conditions.
- Combination Docks: Mix the benefits of both systems for flexible use.
Common Materials Used:
- Pressure-treated wood
- Aluminum or steel frames
- Composite or PVC decking
Material choice affects maintenance, lifespan, and overall cost. Professionals balance aesthetics with performance to ensure long-term durability against moisture and UV exposure.
Step 3: Preparing the Foundation and Dock Supports
The foundation determines the stability and safety of the entire dock system. This stage focuses on securing supports that can withstand movement, water pressure, and environmental conditions.
- Stationary Docks: Pilings are driven deep into the lakebed using heavy machinery or water jetting equipment. These vertical supports form the structural base.
- Floating Docks: Anchoring cables, weights, or augers are used to hold the dock in position while allowing vertical movement with water level changes.
A properly installed foundation minimizes wobbling, tilting, or sinking—ensuring your dock stays level and firm year after year.
Step 4: Building and Aligning the Dock Frame
Once the supports are set, installers assemble the dock frame either onshore or directly over the pilings. The frame gives the dock its shape and structural strength.
Key steps include:
- Measuring and cutting frame sections precisely.
- Using corrosion-resistant fasteners for long-term durability.
- Checking all corners for square alignment.
- Reinforcing joints for added strength against waves or heavy loads.
Aluminum and composite framing materials are often preferred for their light weight and resistance to rust or warping. Proper alignment during this phase prevents long-term balance or stability issues.
Step 5: Decking and Surface Installation
Decking adds the finishing surface to the dock and affects both aesthetics and safety. Professionals ensure decking boards are spaced and secured correctly for drainage and comfort.
Important decking considerations:
- Maintain small gaps between boards for proper water runoff.
- Use stainless steel or galvanized screws to prevent corrosion.
- Apply non-slip coatings for safety.
- Seal or coat wooden decks annually for UV and moisture protection.
This step transforms the frame into a usable dock, providing a smooth, stable, and weather-resistant walking surface.
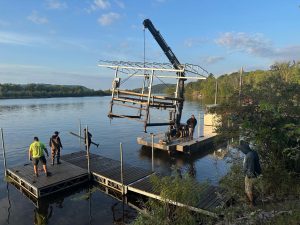
Step 6: Boat Lift Installation and Integration
If your dock includes a lift, this stage focuses on following precise Boat Lift Installation Instructions from the manufacturer. Correct installation prevents equipment strain and ensures smooth operation.
Detailed Boat Lift Installation Steps:
- Positioning the Lift: Measure and align the lift in a suitable depth where the boat can enter and exit easily.
- Leveling the Base: Adjust and stabilize the lift’s base evenly to prevent uneven weight distribution.
- Assembling the Frame: Attach cradles, bunks, and beams securely using the recommended tools and parts.
- Installing Cables or Hydraulics: Follow the manufacturer’s Boat Lift Installation Instructions to connect cables, pulleys, or hydraulic lines safely.
- Testing Functionality: Lift and lower your boat multiple times to confirm balance and mechanical stability.
Proper installation ensures that your boat lift performs safely and reliably in all water conditions, minimizing wear and tear.
Step 7: Final Inspection and Safety Testing
Once the dock and lift are installed, professionals conduct a complete inspection to verify the system’s integrity. This ensures everything operates safely before regular use.
Inspection checklist includes:
- Confirming all bolts, joints, and fasteners are tightened securely.
- Checking that decking boards are flush and free of sharp edges.
- Verifying that the dock remains level in and out of the water.
- Ensuring all electrical systems (if installed) meet marine-grade standards.
- Reviewing the Boat Lift Installation Instructions for final safety adjustments.
After approval, the dock is ready for daily use—strong, level, and reliable.
Maintenance Tips After Installation
A newly installed dock still requires regular care. Following a consistent maintenance schedule prevents damage and prolongs the lifespan of your dock and boat lift.
Maintenance checklist:
- Clean algae and debris from decking and lift parts.
- Reapply sealant or protective coating annually.
- Inspect hardware for corrosion or wear.
- Tighten bolts and check for loose components every few months.
- Follow manufacturer-recommended lift maintenance routines.
Routine maintenance keeps your dock safe, strong, and visually appealing throughout the seasons.
Why Hire Professionals for Dock Installation
While DIY dock kits may look simple, professional installers bring the skill and equipment necessary to ensure stability and long-term reliability.
Advantages of hiring professionals:
- Proper site evaluation and regulatory compliance
- Access to heavy machinery for piling installation
- Expert alignment and leveling
- Warranty-backed workmanship
- Accurate application of Boat Lift Installation Instructions
Experienced teams like JD Hellenbrand ensure that your dock not only looks great but performs safely and efficiently for years.
Final Thoughts
A dock is a major investment in your property’s value, safety, and convenience. Following a structured 7-step process ensures that your installation is handled correctly—from initial planning to final inspection.
By applying proper Boat Lift Installation Instructions, securing the right materials, and scheduling regular maintenance, you can enjoy a safe and durable dock season after season.
CTA: Ready to get started? Connect with JD Hellenbrand today for professional dock and boat lift installation services that ensure quality and long-term performance.
📞 Call: 608-513-0690
📧 Email: jdhellenbrand@yahoo.com
🌐 Visit our Google My Business page to explore our services, customer reviews, and recent projects.
Frequently Asked Questions
1. How long does a professional dock installation usually take?
The time required for dock installation depends on factors like water depth, dock size, material type, and weather conditions. On average, a standard residential dock installation takes 3 to 7 days. Complex projects involving lifts or electrical components may take longer to ensure full safety compliance and structural stability.
2. Do I need a permit to install a dock on my property?
Yes, most regions require a local or state permit before any dock construction begins. Permits help ensure environmental protection, safety standards, and proper shoreline management. Professional installers like JD Hellenbrand assist with the necessary documentation and guidelines so your installation meets all legal requirements.
3. What type of dock is best for changing water levels?
If your lake or river experiences fluctuating water levels, a floating dock is often the best option. Floating docks rise and fall with water levels, maintaining accessibility throughout the year. Stationary docks are ideal for stable water conditions. An expert installer can assess your site and recommend the most reliable setup for your environment.
4. How do I maintain my dock and boat lift after installation?
Regular maintenance helps extend the lifespan of your dock system. You should:
- Clean off algae and debris monthly.
- Tighten all fasteners and inspect joints for corrosion.
- Reseal or coat wooden surfaces annually.
- Review the Boat Lift Installation Instructions to maintain cables, pulleys, and motors properly.
Seasonal care ensures your dock remains safe, level, and functional all year round.
5. Can I install a boat lift myself, or should I hire a professional?
While some boat lifts come with DIY kits, it’s best to hire a professional installer for accuracy and safety. Following the Boat Lift Installation Instructions precisely is essential to avoid alignment issues, uneven lifting, or cable damage. A certified team ensures your lift operates smoothly and complies with safety regulations, protecting both your dock and your boat.